Code Skeletons |
|
|
Code Skeletons |
|
|
Code skeletons, if defined properly, is a powerful way to reduce development time.
|
|
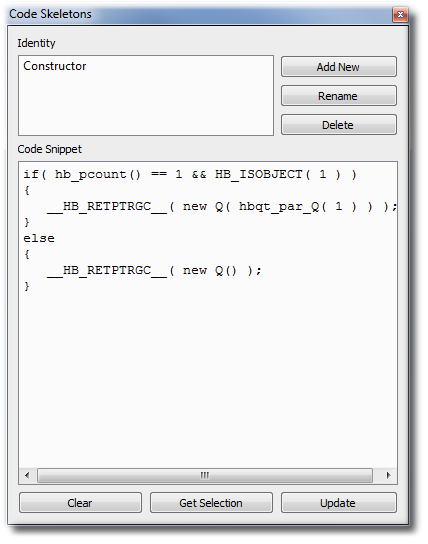
How to write ========= * Click <Docks> main-menu option and select <Code Skeletons>. * "Code Skeletons" window will open at the right-docking area. * Close other docks if open to make room for its components. * Click <Add New> button, a dialog will appear requesting a "Name". * Enter recognizable name for this skeleton, i.e., "DO CASE 3", where "3" will represent that this case statement contains 3 iterations of CASE statement. It is just an example, follow your way of recognitions. * After you click <ok> the name will appear in "Identity" list-box. * Start writing in "Code Snippet" editor, like: DO CASE CASE x == CASE x == CASE x == ENDCASE * After you are done with it, click <Update>. * Repeat the process for some other skeletons. * Do not forget to click <Update> even after slightest modification. This will ensure that your skeleton is always in order. * If you wish to change the name, click on that "Name" in "Identity" list-box and click <Rename>, follow next process. Click <Update> to save permanently. * <Delete> is not working yet. * Navigate the skeletons by clicking on the prompts; you will find the attached code in the editor below.
How to Call ======== * While in the editor tab, position your editing cursor at desired column. * Press Ctrl+K, a context menu will appear near left-upper part of the editing tab containing all skeletons you wrote. * Use arrow-up/down keys to desired skeleton and press <Enter>. * The code skeleton will be inserted in the source aligned to the column you started with. The cursor will be anchored on the same place. * Alternativly you can use mouse, but keyboard navigation is simple in this context. * Note that alignment and indent of inserted code skeleton is perfect to starting column. |
|
1. Creating of skelton is as before with same interface.
2. In addition, the selected text in the current editor can be saved as a skeleton via "Save as Skeleton..." option in right-click context menu. A "Name" will be asked via a modal input edit dialog.
3. A new "Skeletons" tree-view is implemented at the Left-hand docking area which displays all skeletons by name.
4. Hovering cursor over the name node shows up the body of skeleton as a tooltip, very handy.
5. Double-click on the node in tree-view will insert the skeleton text at the current cursor position.
6. Alternatively, as before, menu can be activated via CTRL+K.
7. Skeletons body now supports meta data as follows: --- DO WHILE .T. IF cVar == "<-PROMPT>" xVar := <-DtoC( Date() )> ENDIF <-CUR> EXIT ENDDO ---
You can see there are 3 occurances of <-*> token.
<-PROMPT> will execute an input dialog and the resultant string will be inserted here.
<-DtoC( Date() )> will evaluate the expression, which in this case, - "03/18/2010" - will be inserted. This means any valid Harbour expression which returns a string can be designated as meta-expression.
<-CUR> will position the cursor at this place. |
|
! Meta concept enhanced further. <-NAME=PROMPT> ; then NAME will be the meta and string returned by PROMPT dialog will be assigned to <-NAME> for next occurances. The assignment is done only with <-PROMPT> meta.
This feature is especially useful when skeleton is built defining a class:
--- SKELETON ---
#include "common.ch"
/*------------------------------*/
CLASS <-NAME=PROMPT> INHERIT IdeObject
DATA oUI
METHOD new( oIde ) METHOD create( oIde ) METHOD destroy()
ENDCLASS
/*------------------------------*/
METHOD <-NAME>:new( oIde )
::oIde := oIde
RETURN Self
/*------------------------------*/
METHOD <-NAME>:create( oIde )
DEFAULT oIde TO ::oIde ::oIde := oIde
RETURN Self
/*------------------------------*/
--- INSERTION ( after input "MyNewClass" in the dialog ) ---
#include "common.ch"
/*------------------------------*/
CLASS MyNewClass INHERIT IdeObject
DATA oUI
METHOD new( oIde ) METHOD create( oIde ) METHOD destroy()
ENDCLASS
/*------------------------------*/
METHOD MyNewClass:new( oIde )
::oIde := oIde
RETURN Self
/*------------------------------*/
METHOD MyNewClass:create( oIde )
DEFAULT oIde TO ::oIde ::oIde := oIde
RETURN Self
/*------------------------------*/
|
|